Wednesday, July 22, 2015

What’s new in PeopleTools 8.54?

Oracle has released PeopleTools 8.54 a year back and as of now it is also available with the PUM image for HCM and FSCM.
Peoplesoft has come with many changes with PeopleTools 8.54 and I would try to list out important ones.
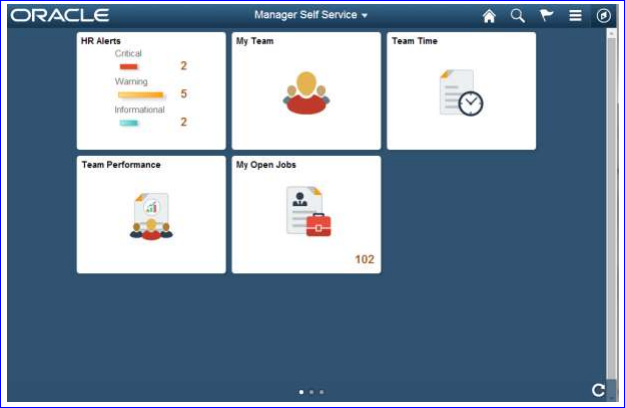
Fluid pages


The usage of mobile phones and tablets have changed drastically in recent times.
PeopleSoft embraces this change and comes with many new concepts primarily targeting the mobile devices.
With this release PeopleSoft introduces the PeopleSoft Fluid User Interface.
This is a significant improvement over the PeopleSoft “classic” user interface, the PeopleSoft application fluid pages scale gracefully from large screen devices, such as laptops and desktops, to the reduced viewing space of tablets and smartphones whereby the presentation and layout of information is adjusted dynamically to conform to the dimensions of the user’s device.
 
PeopleSoft fluid page definitions are maintained within PeopleSoft Application
Designer, and the application developer will have the ability to define and apply conditional formatting appropriate to smartphone, tablet, or large-screen devices.
 
So to check this on, I created a new page in App Designer.
When I clicked on properties of the page, we have a new tab here ‘Fluid’.
 

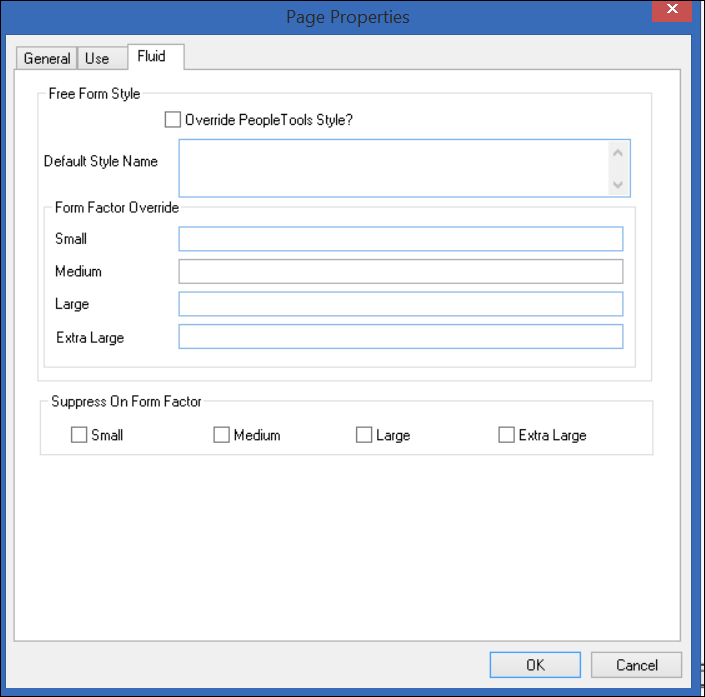
It will take some time and practice for us to get used to all these field to know their significance.
So we will leave it as it is.
 
In case you want to learn to more about this tab, please refer Peoplebooks.
 
64-Bit Development Client
 
With PeopleTools 8.54 the Development Client is now built as a 64-bit application, taking advantage of
higher memory addressing and improved performance.
The following applications run on the Development Client and are impacted by this enhancement:
  • Application Designer.
  • Data Mover.
  • Change Assistant.
  • nVision
  • Change Impact Analyzer
  • Application Engine.
  • SQR.
The move to the 64-bit bit architecture of the PeopleTools development environment means that
system administrators no longer need to acquire and configure the additional 32-bit connectivity
software for the RDBMS platform.
 
Mobile Application Platform
 
With release 8.54, PeopleSoft is delivering, for the first time, the ability to create a responsive user
interface using standard technologies such as HTML5, cascading style sheets (CSS3), and JavaScript.
Applications built using the Mobile Application Platform (MAP) will provide a completely different
experience than those built using traditional PeopleTools components and pages. Applications built with
MAP can include media queries that allow applications to scale from Smartphones, to mini-tablets, to
full-size tablets, and that adjust the user interface for the device perspective that is being used. The
framework allows you to develop applications with touch interfaces that look and operate similarly to
native interfaces on mobile devices.
MAP supports a web-only development model for the majority of the application development. The
document-based data structures, page layouts, and styles are all defined in the PeopleSoft Pure
Internet Architecture. Business logic processing is done through PeopleTools application class
PeopleCode built in PeopleSoft Application Designer. Additional user-interface libraries can be easily
plugged in and accessed on pages.
While MAP is similar in many ways to the PeopleSoft Fluid User Interface delivered with PeopleTools
8.54, there is a single major difference. That difference is that MAP reads and writes data through
RESTful web services that pass through the integration gateway and provide the communication layer
between MAP applications and the database.
Using RESTful services as the foundation of the framework offers these significant differences:
Since all parts of the application are based on REST services, an open integration model that
enables an application to navigate from one application to another, including third-party
applications, is inherent in the design.
 
 
Application Engine
 
Application Engine Trace File Enhancements
PeopleTools 8.54 will include the following features to streamline Application Engine Trace files.
Application Engine trace file split.
You can set the file size of the Application Engine Trace file. Whenever the file size exceeds the
defined file size value, the file will close and the log will shift to a new file. Application Engine trace file naming convention.
The naming convention for the Application Engine Trace file with a process instance will include the
Date/Time stamp.
Application Engine program section trace.
In previous versions, the trace file included output of the Application Engine program with all the
sections. From this release you can select the sections to trace output in the Application Engine
Trace file.
Application Engine trace file with PeopleCode and SQL trace outputs.
You can combine the trace output for both PeopleCode and SQL into Application Engine Trace file.
Also for 8.54, it will be optional to commit changes in the Application Engine program to the database.
You can opt not to commit the changes for application engine program to the database, if the
application engine program is running from Application Designer.


Global Temporary Table in Application Engine
 
PeopleTools 8.54 extends the potential of Oracle Global Temporary Tables (GTTs) to Application
Engine.
In 8.54, you can define Temporary Tables as GTTs in the Application Designer. This feature can be
applied to Application Engine programs running in both batch mode and online mode. The data in GTT
is session specific for Application Engine programs running in batch mode and transaction specific for
Application Engine programs running in online mode. But GTTs in online mode cannot be shared
between Application Engine programs. Each Application Engine program has its own set of GTTs.
Therefore, it is recommended that GTTs should not be used as Share Tables in online mode. You can
also define GTTs to re-startable batch Application Engine programs considering that the data in GTT
will not be retained when the program exists.
Prior to 8.54, a warning was displayed whenever the number of instances of a temporary table
exceeded 99. From 8.54, you can set the number of instances to a maximum of 9999 when the
Application Engine program uses only GTTs in temporary tables. If the Application Engine program is
using both GTTs and temporary then a warning is displayed when the number of instances exceeds 99.
 
 
Portable PS_HOME
PeopleTools has focused on a number of enhancements related to PS_HOME in recent PeopleTools
releases to make PS_HOME more secure, with a clearer separation of functionality. It began with
providing a more secure installation by splitting out logs, cache and configuration files into
PS_CFG_HOME, which allowed PS_HOME to become read-only. From there, we created
PS_APP_HOME to split the PeopleTools and PeopleSoft application objects apart, thus removing any
ambiguity of which objects are changed during a PeopleTools vs. application upgrade, or during the
application of maintenance. PS_CUST_HOME arrived with PeopleTools 8.53 and provided a
mechanism to separate any customized code (COBOL, SQR, and so on) from delivered code.
With PeopleTools 8.54, the latest enhancement involving PS_HOME, Portable PS_HOME, will provide
an easier way to use a private cloud configuration where multiple application installations use the same
PeopleTools install. Hard-coded paths and symbolic links are removed, which will allow the install of
PeopleTools to be more easily copied to other servers. UNIX file servers can create a mount point to
use the installation with any number of environments. With a single PeopleTools install being used with
multiple application installs, procuring an environment becomes faster and cheaper. In addition, when it
is time to apply maintenance, it is quickly performed in one place instead of in each separate
environment, thus lowering the total cost of ownership.
 
Oracle Materialized Views
Materialized views take the results of complex SELECT statements and save the datasets to disk. The
results are then readily available without the need to run the SQL each time. The SELECT statements
typically defining materialized views often contain sizable tables, complex joins, and summary functions
that may take some time and computing resources to complete. By running the SQL once and saving
the results to be used and reused, a significant savings of CPU and memory consumption can be
achieved. Materialized views provide significant improvements in performance when used in Pivot Grids
that do not use frequently updated data sets. The data is refreshed on a time period defined in the
materialized view.
PeopleTools 8.54 enables potentially significant CPU savings by using materialized views for the
Oracle database. Application Designer will have the ability to declare and define materialized views
(including the data refresh period) for use within PeopleSoft applications.
 
 
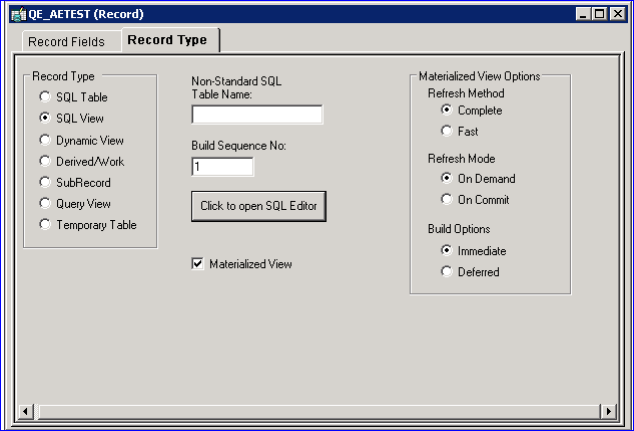
Chart Class Enhancements
 
In PeopleTools 8.54, the Chart class has been enhanced with these features and other features not
listed here:
Reference areas – A reference area can be displayed in conjunction with a chart as a band of color
drawn based on numeric values along a chart axis. For each band of color, you would create a
separate instance of the ReferenceArea class.
A bar chart with a reference area displayed behind the chart
 
->Reference lines – A reference line can be displayed in conjunction with a chart as a colored line
drawn based on a numeric value along a chart axis. For each line, you would create a separate
instance of the ReferenceLine class.
 
->Funnel charts – A funnel chart typically graphs two sets of data: actual amounts versus target
amounts.
 
A funnel chart displaying actual data versus target data
 
->Line smoothing – Using the IsLineChartSmoothing property allows line charts to be displayed with
smoothed lines.
 
->Interactive charts – Using the IsChartDrillable property, the chart background (that is, the entire
chart control) can be made interactive. (This is in addition to the chart data points, which can
already be made interactive by using the IsDrillable property.)

PeopleSoft Pivot Grids
Since their release a few years ago, Pivot Grids have become a valuable component of PeopleSoft’s
rich reporting and analytics toolset. With PeopleTools 8.54, our teams continue to enhance this
important technology to become an integral element of the PeopleSoft user experience.
As mentioned, the PeopleSoft Fluid User Interface takes advantage of Pivot Grids both on the new fluid
homepage tiles as well as the basis for the new component search framework used for fluid
components. These new capabilities ensure that visual insight and analytics are woven directly into the
fabric of the PeopleSoft application, rather than merely graphics pasted onto a page.
PeopleTools 8.54 brings a number of extremely important new features to PeopleSoft Pivot Grid:
  • Setting the limit of the Pivot Grid result rows.
  • Viewing PSQuery drilling URLs in Pivot Grid Detail View.
  • Scatter and Bubble chart types.
  • Attaching PeopleSoft Trees to dimensions.
  • Setting Column Type value.
  • Setting Aggregate value.
  • Setting currency formats.
  • Setting the Display As option.
  • Setting embedded help.
  • Specifying the display mode.Release Notes PeopleSoft PeopleTools 8.54
  • July 2014
  • Copyright © 2014, Oracle and/or its affiliates. All rights reserved. 49
  • Specifying the fluid mode options.
  • Expanding or collapsing all dimensions in the grid.
  • Configuring Pivot Grid Views using Pivot Grid Wizard.
  • Publishing Pivot Grid fluid views as grouplets.
  • Creating Pivot Grid models directly from Query Manager.
  • Setting row-level, aggregate, and bulk related actions.
  • Displaying all views in the Pivot Grid Viewer search page.
  • Resetting layouts.
  • Drilling down to details from the charts.
  • Using Component Real Time Search in Pivot Grid fluid mode.
  • Creating component Pivot Grid models using Pivot Grid Wizard.
  • Viewing Pivot Grid models in fluid mode.
  • Using the Component Real-Time Search and viewing Pivot Grid models in mobile interaction
  • platforms.
  • Embedding Pivot Grid fluid subpages in application pages.
  • Copying the fluid components between databases.
  • Preserving Pivot Grid configuration and personalizations.
 
PeopleSoft Test Framework
 
PeopleSoft Test Framework (PTF) enables customers to automate testing with a tool that integrates
with and has firsthand knowledge of PeopleSoft metadata. Enhancements for PeopleTools 8.54 focus
primarily on providing smart automation, which is all about running the tests that need to run in the way
that they should be run based on what has happened in your application.
By improving integration among PeopleSoft Test Framework, PeopleSoft metadata, and lifecycle
management reports, in release 8.54, you will now be able to easily determine which tests require
modification and which tests need to be run.
Changes to PeopleSoft Test Framework also include many usability enhancements for creating,
administering, recording, and executing tests.

Branding Framework
PeopleTools now provides a greatly expanded branding framework that is powerful and flexible,
bringing the capability of managing the look and feel to the PeopleSoft application without requiring
PeopleSoft Interaction Hub. With PeopleTools 8.54, many common branding activities, including
managing content associated with the overall site style, are now performed online rather than requiring
the use of Application Designer. In addition, PeopleTools supports component-based branding,
providing the ability to apply a consistent appearance when rendering content from multiple providers
on the same page.
With PeopleTools branding, common actions, such as layout manipulation, style sheet and image use,
and JavaScript injection, can be managed online through the browser. For example, these tasks can be
easily performed within the delivered online pages:
  • Manage configurable header and footer layouts.
  • Assemble branding themes, and assign those themes by portal or by user attributes.
  • Preview style changes online.
 
There are lot other features introduced in PeopleTools 8.54 , please check the release notes/RVP document in Oracle support for details

Creating a Simple Workflow with AWE(Approval Workflow Engine)

Creating a Simple AWE Workflow

With the recent release of Peopletools, peoplesoft has moved from the traditional workflow to the AWE(Approval Workflow Engine).This has greatly segregated the designing of workflow to the functional team and the supporting objects to the Technical Developer.
Unlike Workflow , there is no requirement of creation of Components,steps,rules and routing in Application Designer.
In this way peoplesoft has tried to simplify the workflow process making it more configurable.

Starting with a simple AWE workflow we need to carry out few steps.
Lets create a simple AWE workflow which consists of only one step.
The requester requests for some amount for an asset .When the requester submits the request,
the approvers get the notification by email and worklist. The approvers are the list of all the users who are having the role of Finance Officer (FIN_OFFCR). One of Approver approves the request and the Asset status is set to Approved else Denied.


To AWE to control the flow of events , Let’s start with few definitions.
1.Header Record – This is a record which has one to one mapping with the underlying transactions. Every transaction should insert/update a row in this table.
For the Workflow we are about to setup, it should be record in which every time a request for the Asset/Amount is submitted for approval, corresponding one row is affected in this table.

I named it as T_HEADER


2.XREF Record – This is called as Cross reference record. AWE has predefined its structure as containing the subrecord EOAWAW_XREF_SBR plus the Header’s keys as a nonkey.
The cross-reference maintains the  link between AWE’s transaction tables and transaction using the keys from Header Record.

I created a XREF record as below.


3.Transaction Component

Now we need a component which will trigger the workflow or where the requester will submit the requests.


Component Structure in App Designer.

I have added 3 buttons :Approve, Deny, Submit.
The buttons as suggested by their name are to Submit, Approve or Deny a Request.
At this moment all three buttons are visible but we will control its visibility as we progress.
We will later see how this page is customized to fulfill our requirements.

4. Event Handler – AWE is controlled by events, when a request is submitted, a event takes place, when a request is approved a event triggers, when a request is denied , a event take place.
Each of these events are handled by AWE delivered class EOAW:CORE. If we want to do other stuffs than what the delivered app package does, we need to create our Event Handler ,extending the core EOAW classes.
As of now we do not need to create any event Handler, the delivered EOAW:Core app package will do our job. But, later we will see that we need to create an event handler to tackle our requirement.

5. Configuring AWE , Registering the transaction.

Navigate to :

Add a new Process ID, Let us create a process  ID “ASSET_APPROVAL”.

Enter the Cross Reference Record which we defined in Step2.
In Notification Options Select as below.

The checkbox ‘Use Email Approval’ and below fields are used when we are using EMC. Now it is not required. We will see details of EMC in the advanced chapters on AWE.


Keep the Internal URL definition and External URL definitions blank.
We do not need these as of now.


Fill the Default Approval Component as below. This is the same transaction component we created in step 

We are keeping Approval Status Monitor” section as blank.
We do not need these items for our simple AWE.

As explained earlier, “Approval Event Handler Class”  is used to do some stuffs when a particular event triggers like updating the “Status” field to “Approved/Denied” when the request is approved/Denied.
As of now we have not created any Event Handler for our workflow , so we will use the delivered App package and Class as shown below.
Later  we will replace this event handler with our event handler class.

“Approval Status Monitor” section defines  Adhoc class and Thread class.
Adhoc class is used for entering adhoc approvers/reviewers or paths in the usual AWE workflow.
Thread Class is used to control what is displayed in the Approval Monitor.


Enter the details of Header record and its key fields as below in the “Transaction Approval Levels”
section.


Save the page.


6. Configuring AWE ,Transaction Configuration


EVENTS:
Configure the events as below:


We need to pass email template to the AWE workflow .
This can be created as below.
Please note that bind variable %1 is used by AWE and it means the URL pointing to the transaction.


.


7. Configuring AWE ,Approval Process Setup
Before Creating the Approval Process , we need to setup USERLIST which is required.
Userlist defines the list of user who will be getting the notification when some event triggers.
Here ,we are creating a userlist of all the users having the role FIN_OFFCR as shown below.


Adding the Approval Process Setup.


Since, we are creating approval process of only one step.
We will create only one stage,one path and one step in the setup.

Click on Definition Criteria and set it as Always true.


Click on Alert Criteria and set it as Always true.


Click on Path Criteria and set it as Always true.


Click on Step Criteria and set it as Always true.


All Criteria is now set, So a tick is appearing in each criteria link.

Criteria are used to determine whether to enter a path,step,stage or not.


Click on Save:

8. Coding the workflow.


We had three Push buttons : Submit , Approve and Deny.

Lets code that when user clicks on Submit , it launches the AWE workflow.
When the Approver , approves the request it completes the workflow as approved and vice versa.

Lets writewhen the user clicks the submit button, we assign the variable &c_apprAction as “S”,
Approve button as “A” and Deny button as “D”.


We have written the code on buttons but we still have not launched the AWE. The best place to trigger AWE events are at SavePostchange as all the validations are done by that point.


For launching AWE workflow we need to call the DoSubmit() method of the EOAW_CORE:LaunchManager class.
For Approving the running Workflow the DoApprove() method has to be called.
Similar is the case for DoDeny().
Below is the code:


import EOAW_CORE:LaunchManager;
import EOAW_CORE:ApprovalManager;

Declare Function createStatusMonitor PeopleCode EOAW_MON_WRK.EOAW_FC_HANDLER FieldFormula;


Component string &c_apprAction;
Component EOAW_CORE:LaunchManager &c_aweLaunchManager;
Component EOAW_CORE:ApprovalManager &c_aweApprManager;
Local Record &headerRec = GetRecord(Record.T_HEADER);
Local boolean &isApprover;


Evaluate &c_apprAction
When “S”
  &c_aweLaunchManager.DoSubmit();
  If (&c_aweLaunchManager.hasAppInst) Then
     REM ** Initialize Approval Manager if transaction was submitted;
     &c_aweApprManager = create EOAW_CORE:ApprovalManager(&c_aweLaunchManager.txn.awprcs_id, &headerRec, %OperatorId);
  End-If;
  Break;
When “A”
  &c_aweApprManager.DoApprove(&headerRec);
  Break;
When “D”
  &c_aweApprManager.DoDeny(&headerRec);
  Break;
End-Evaluate;

If &c_aweApprManager.hasAppInst Then
  &isApprover = &c_aweApprManager.hasPending;
    createStatusMonitor(&c_aweApprManager.the_inst, “D”, Null, False);
End-If;

Adding the Approval Monitor Page:


Postbuild Code;
import EOAW_CORE:LaunchManager;
import EOAW_CORE:ApprovalManager;

Declare Function createStatusMonitor PeopleCode EOAW_MON_WRK.EOAW_FC_HANDLER FieldFormula;
Component EOAW_CORE:LaunchManager &c_aweLaunchManager;
REM ** Component scoped AWE Approval Manager for approve/deny;
Component EOAW_CORE:ApprovalManager &c_aweApprManager;
Component string &c_apprAction;

Constant &PROCESS_ID = “ASSET_APPROVAL”;
Local Record &headerRec = GetRecord(Record.T_HEADER);
/******** PostBuild mainline code ********/

/* Initialize the launch and approval managers. ApprovalManager will
* need reinitialization on submit
*/
&c_aweLaunchManager = create EOAW_CORE:LaunchManager(&PROCESS_ID, &headerRec, %OperatorId);
&c_aweApprManager = create EOAW_CORE:ApprovalManager(&PROCESS_ID, &headerRec, %OperatorId);
/* Uncomment the following line if you don’t want AWE to choose the
* Definition Id based on the preconfigured definition criteria.
* Definition criteria is maintained using the “Setup Process
* Definition” component.
*/
&c_aweLaunchManager.definition = “SHARE”;


If &c_aweApprManager.hasAppInst Then
  &isApprover = &c_aweApprManager.hasPending;
  createStatusMonitor(&c_aweApprManager.the_inst, “D”, Null, False);
  
End-If;

9. EOAW_IDS:
Last but not the least, we need to setup EOAW_ID for our workflow.
EOAW_IDS defines a number from which AWE will start creating threads.
In HCM its is similar to what will be the first Emplid and it will be then incremented with each emplid creation.
Same as emplid, you can initialize your workflow with some number and then AWE will take care of incrementing it and maintaining it with your transactions.

It requires a manual insert SQL.

INSERT INTO PS_EOAW_IDS(EOAWCOUNTERNAME, EOAWCOUNTER)VALUES (‘APT_WA_AWE_XREF’, 1);

We should not change this value once it is setup. This can cause multiple transactions to end up with the same keys.

Approval Component.


Lets add a new Asset id for approval.


We still have all the three buttons on the page which we need to control.
The submit button should only be visible for the requester and Approve and Deny button should be visible for the Approver.


We can write a small piece of code checking if the workflow has started or not, if not show SUBMIT button else show Approve and Deny button.

We can make use of the “hasappinst” property of the Approval Manager object which we used to display Approval Monitor Earlier.

Postbuild code:


If &c_aweApprManager.hasAppInst Then
  T_BUTTONS.SUBMIT_BTN.Visible = False;
  T_BUTTONS.DENY_BTN.Visible = True;
  T_BUTTONS.APPROVE_BTN.Visible = True;
  
Else
  T_BUTTONS.SUBMIT_BTN.Visible = True;
  T_BUTTONS.DENY_BTN.Visible = False;
  T_BUTTONS.APPROVE_BTN.Visible = False;
End-If;


So,now the buttons are displaying correctly.

Let’s go ahead and submit a request for this Asset.
One thing I missed was to include a currency code field in the page which tells the amount’s Currency.
This will be also useful when we define a ‘Criteria’ on monetary basis because you cannot have a monetary criteria without currency code.
Criteria will be discussed in later chapters.


Let us add the currency code field on the page. Since this field is going to be a non key , this is not going to impact to workflow and we can add it without issues. You may add it in the header record and use it on the page.


So our page now looks like below:


Now is the time to test our workflow.


Lets submit a request for an asset


Click on Submit


Wooow, you can see a the approval monitor below.
It means, our workflow has triggered.


The approval monitor shows that it is pending with finance officer KUTL101.

Lets log in as KUTL101 and see if there is any worklist created for this request.

Logging as KUTL101.


We see the worklist in KUTL101 inbox , that means our workflow has triggered.
Lets go ahead and Approve the request.


Click on the Approve button:


We have successfully completed the AWE workflow.
The approval monitor is showing the transaction to be approved but still the status at the top right corner is showing as pending. This is because AWE does is not aware of this field .

The Eventhandler class comes into picture in scenario like this where we want to do some stuff on AWE events.

Lets go on create an event handler class which update the status of the status field as “Approved” when the request is approved.

I have created a app package and inserted a class in the package.


The class extends the EOAW_CORE classes and update the “Status” field as approved or Denied according to the approver selection.
import EOAW_CORE:ApprovalEventHandler;
import EOAW_CORE:ENGINE:AppInst; import EOAW_CORE:ENGINE:UserStepInst; import EOAW_CORE:ENGINE:Thread; import TRAVERSEALLFIELDS:DisableFields;  class WebAssetAppr_EventHandler extends EOAW_CORE:ApprovalEventHandler    method OnHeaderApprove(&appinst As EOAW_CORE:ENGINE:AppInst);    method OnHeaderDeny(&userinst As EOAW_CORE:ENGINE:UserStepInst); private    method UpdateStatus(&thread As EOAW_CORE:ENGINE:Thread, &status As string);    method componentDisplayOnly(&Rs As Rowset); end-class;  method OnHeaderApprove    /+ &appinst as EOAW_CORE:ENGINE:AppInst +/    /+ Extends/implements EOAW_CORE:ApprovalEventHandler.OnHeaderApprove +/    %This.UpdateStatus(&appinst.thread, “X”);     end-method;  method OnHeaderDeny    /+ &userinst as EOAW_CORE:ENGINE:UserStepInst +/    /+ Extends/implements EOAW_CORE:ApprovalEventHandler.OnHeaderDeny +/    %This.UpdateStatus(&userinst.thread, “D”);     end-method;  method UpdateStatus    /+ &thread as EOAW_CORE:ENGINE:Thread, +/    /+ &status as String +/    /* &thread.recname contains the header record name, but we are * using a sibling record so we have to hard code the record name */    Local Record &asset_rec = CreateRecord(Record.T_HEADER);    /* &thread.rec contains the cross reference record which has * header record keys*/    &thread.rec.CopyFieldsTo(&asset_rec);    &asset_rec.SelectByKey();    &asset_rec.GetField(Field.APPROVAL_STATUS).Value = &status;    &asset_rec.Update();    GetLevel0().Refresh();    %This.componentDisplayOnly(GetLevel0()); end-method;  method componentDisplayOnly    /+ &Rs as Rowset +/    Local number &i, &j, &k;    For &i = 1 To &Rs.ActiveRowCount       For &j = 1 To &Rs(&i).RecordCount          For &k = 1 To &Rs(&i).GetRecord(&j).FieldCount             &Rs(&i).GetRecord(&j).GetField(&k).DisplayOnly = True;          End-For;       End-For;       For &j = 1 To &Rs(&i).ChildCount          %This.componentDisplayOnly(&Rs(&i).GetRowset(&j));       End-For;    End-For; end-method; 
You might have notice that I have created a method “ComponentDisplayOnly” to make all the fields disabled once the user Approves or Deny the request.
This function uses recursive method to loop throught each field in the component and makes them displayonly.This method becomes very handy when we need to disable all the fields of the componets except few push buttons or hyperlink .In that case the ususal page class peoplecode, page.displayonly won’t be affective and it will make buttons and hyperlinks also disabled and you can not change it via peoplecode.
More detail of this method can be find in this link.


Now we need to modify the Transaction Registry to include this Event Handler.

Save the page.


Lets submit a request again.


So the code is working as expected.
Well Done
***************************************************************************