Tuesday, July 28, 2015

PeopleSoft Fluid User Interface

With the latest release of PeopleTools 8.54  , Oracle has introduced  the Fluid User  Interface experience.
The Fluid UI provides the users with the ability to access PeopleSoft applications across a variety of form factors from smart phones to tablets to desktops/laptops. Fluid also provides a common user experience on variety of devices regardless of the screen size. Through this responsive design, browser will resize itself depending on device size.

Lets have  a look at the home page that is rendered after the latest peopletools has been used.


The important features of home pages are as below:
  •  Home Pages
  •  Tiles
  • PeopleSoft Search widget
  •   Notifications widget
  • Actions widget
  • Navigation Bar widget.
The fundamental feature of the Fluid Model is the Home Page which provides the base for the users or the customers to navigate and carry out the respective works.
In a way Fluid home pages are similar to the current home pages but  fluid model provides the end user with the new User experience that renders well on the dashboard or the home pages.

Tiles/Grouplets are lifeline of Fluid UI page. Tiles help the user to navigate to a fluid page or classic PIA page.

Business Benefits

  •  Device independent
  • Gives the response based on user device
  • Can be personalized based on needs e.g. Tiles can be added or deleted from homepage based on personal needs

      Development Steps 

Let us design a simple fluid UI page for following requirement..
  • To create a fluid homepage for Recruiter
  • To add a tile for Applicant search
      1) Development of Fluid Home Page


Developing a fluid home page is fairly easy and is done through PIA.
Navigation:  Peopletools> Structure and Content>Fluid Structure and Content>Fluid Homepages.

Add a new homepage. Usage Type should be Landing Page as shown in figure below.


       2)      Development of a Fluid Component

Development of a fluid component goes in the same traditional PeopleSoft way- creation of fields, record, page, component, menu and finally creating the content reference. Fluid properties are defined at page and component level.

Step1: Create a new fluid page


While creating a new fluid page, choose Layout Page. Layout page is the template page for a fluid UI page.

Step2: Select Fluid UI Page Properties

After page is created, fluid UI properties can be set in Page properties.


In Page properties, user should focus more on Form Factor Override and Suppress Form Factor.
Form Factor Override: Overrides the style of page based on device size.
Suppress Form Factor: Suppresses the page from displaying based on device size. E.g.  If Small is checked, page will not appear on most smart phones.

Step 3: Create a new component.

Creating a new fluid component works in the same traditional PIA way. But the search pages are not displayed for fluid applications.

Step 4: Set component fluid properties


As shown in above figure, there are two main checkboxes, Fluid mode and Small Form Factor Optimized


Step6: Add the Tile in home page

Navigation: Main Menu>Fluid Home>Homepage 
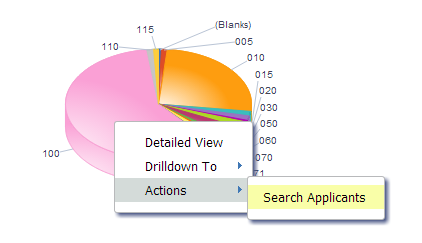
  1. Click on Action Widget
  2. Click on Personalize
  3. Click on Add Tile
  4. Select the content reference which has to be added as a tile.
  Fluid UI is ready for test.


Clicking on tile 'Applicant List' will open  the designed Fluid UI page.


Best Practices:
 Always check Display on Small form Factor Homepage while creating the content reference. This will show the tile on small devices
.
Limitations:
  • Classic PIA search for a component does not work in Fluid. User should create a separate search by selecting the correct layout.
  • Currently, only light weighted applications can be deployed in fluid mode e.g. components like add a person, job data which demands heavy data entry are not suited for fluid mode.
  • Currently, some features, like spell check, rich text editor, Find In for grids, Download to Excel, modal movement or re-sizing, are not available in fluid.

PeopleSoft Pivot Grid

The PeopleSoft Pivot Grid is a reporting tool used to provide a pivot table and  chart representation of live data using PS Query data source. This enables users to visually display data in a dashboard. Data can be displayed in different views by performing operations such as pivoting and filtering, which enables business analysts to interpret data in a variety of ways.


Business Benefits:         
  1. Pivot grids can be published as pagelets, so can be published on home page or any other navigation.
E.g.: Managers can use this pivot grid on their Dashboard to track the Employees Report, Direct Line Reports, Employees Head count etc…

  1. Users can take action directly from the chart/report. - Related Content can be configured in Pivot grid.


  1. Drilling Down on the Aggregate Values
                  
The detailed view displays the complete data of the grid and Actions dropdown helps navigate to related links or action can be taken.
  1. Inter Window Communication: Pivot Grid Pagelets can interact with each other and with the transaction pages. Configure Publication and Subscription with all the intersecting Prompt and Filter values between Pivot grids. We get the consistent behavior with progressive filtering in the publisher and subscriber.

  1. Pivot grids can be published as Related Content on any of the components, so that the user can refer them easily.

  1. Displaying Grid from Chart-only view -  Display the grid from a chart-only view and then perform various actions—such as pivoting data, dragging and dropping, and slicing and filtering data—to change the grid layout. After the layout is satisfactory, you can synchronize the chart with the grid view.

  1. View grid option allows user to display the results of the query in grid format and filters can be applied.

  1. PeopleSoft Pivot Grids allow the user to analyze data within the PeopleSoft application.  The advantage here is that, as we all know, initial data analysis often leads to more questions and a need for deeper analysis. PeopleSoft Pivot Grids allow the user to dive deeper, all the way down to the transactional level into the system to grab more data for the desktop spreadsheet. It is cleaner, easier and more efficient.
  2. Pivot Grids allow the user in a specific job role to focus on the activities that are most important to their specific job requirements.  The user is able to immediately access the most Relevant information for their role. Information is easily prioritized and action lists can be created.

Development Process
Pivot grid can be developed in five easy steps:
Navigation: Main Menu -> Reporting Tools -> Pivot Grid -> Pivot Grid Wizard.

Step1: Provide pivot grid basic details - grid name, title and type.

Step 2: Provide data source type and PS Query name.
Step 3: Provide data model values. At least one value and axis for the column should be specified.
Along with at least one value and axis specifying for the columns.

Step 4: Provide X and Y axis and filters.
Specify data model options providing X and Y Axis and specify filtering in fourth step.

Step 5: Verify the pivot grid, publish it as pagelets or related content.


Limitations on Pivot Grid:
  • Supports only PS Query as data source.
  • Pivot Grid Does not have a Vertical Scroll bar for viewing data, but it displays all possible rows based on the current layout.

Wednesday, July 22, 2015

PeopleSoft Enterprise Software & Documentation

Sending email through SQR is a common requirement. The command should be used for sending emails depends on which Environment your SQR is going to run. In Windows, you can use BLAT.exe, PSMAIL.exe. In UNIX, you can do by calling command “Mailx” or “mail”.
In Windows Environment:
PSMAIL.exe is a PeopleSoft delivered program.
PSMAIL.EXE looks for the environment variable PS_SERVER_CFG to retrieve its SMTP Settings. That variable is usually set on the Application Server and Process Scheduler on boot up. On the Application Server, it usually is set to %PS_HOME%\appserv\\psappsrv.cfg. On Process Scheduler, it usually points to %PS_HOME%\appserv\prcs\\psprcs.cfg.
Following are the possible command line arguments:
TO = the recipients of the email
CC = carbon copy list of recipients
BCC = blind carbon copy list of recipients
FROM = the sender of the email
SUBJECT = the subject heading of the email
BODY = the email body
FILE = list of file attachments to send with email. File location is relative to where PSMAIL.EXE is run from.
ALIAS = Used to create a short name for the file being attached, otherwise the receiver gets the complete path/filename
INPUT =points to a config file that contains the above seven arguments. This was to bypass the maximum number of characters allowable on a command line and carriage return/line feeds.
The tokens – or / can be used in front of the above arguments. The values for each argument must be encapsulated in double quotes. Look at the following examples.
Sample usage:
PSMAIL -TO”rob_smith@abct.com” -FROM”SystemTest_InvRpts@abc.com”
-SUBJECT”Daily Inventory Report(s)”
PSMAIL /TO”edward_jones@abc.com” /FROM”HR@abc.com” /SUBJECT”Time Out
Reporting” /BODY”Please report any PTO for the month of March.”
PSMAIL /INPUT”demo1.txt”
The content of the file, “demo1.txt” is as below:
-TO”lisa_harper@abc.com;Robert_thomas@abc.com”
-FROM”SystemTest_InvRpts@abc.com”
-SUBJECT”System Test Daily Inventory Report(s)”
-BODY”Here is the report(s) you requested. (Both A & B Databases)”
-FILE”d:\temp\ps\e800r20\in_bu_bal_A.out;d:\temp\ps\e800r20\in_bu_bal_B.out”
If you are using -INPUT or /INPUT then you need to have the input file in UNICODE format. (On NT, you can do this by saving the file in notepad as “Unicode format” & on Unix you can run the following PeopleSoft binary file: PSUNICONV ASCII UCS-2 )
BEGIN-PROCEDURE sendmail
let $subject = ‘Subject of the Email Here’
let $to_list = ’email@email.com’
let $ReportID = ‘File name along with path’
let $alias =’Attachment File Name Alias including the file extension’
let $enter = chr(10)chr(13)
let $body_txt = ‘Hi,’$enter$enter’Please Find the Report attached with this email.’$enter$enter’Regards,’$enter ‘Peoplesoft Application Support’$enter$enter’PS: We request you not to reply to this automated mail trigger.’
let $mail-cmd = ‘ \\HHOT3Q7CPSH02\psoft\HR880DEV\bin\client\winx86\psmail -TO”‘$to_list'” -SUBJECT”‘$subject'” -BODY”‘$body_txt'” -FILE”‘ $ReportID ‘” -ALIAS”‘$alias'”‘
CALL SYSTEM USING $mail-cmd #Status
if #status <> 0
show ‘ERROR: Could not send email!’
end-if
end-procedure sendmail
In UNIX Environment:
Below is the sample code to send mail from UNIX Environment.
Mail without Body text with attachment:
let $mail-cmd = ‘(uuencode Filename_with_fullpath.extension Filename_to_be_displayed_in_mail.extension)’ | mail –s “Mail Subject” –c “cc Mail Address” to-Mail Address’
call system using $mail-cmd #Status
if #status <> 0
show ‘ERROR: Could not send email!’
end-if
Mail with Body text without attachment:
let $mail-cmd = ‘mail –s “Mail Subject” –c “cc Mail Address” to-Mail Address’
call system using $mail-cmd #Status
if #status <> 0
show ‘ERROR: Could not send email!’
Mail with Body along with Attachment:
Here no need to generate temporary file for mail body.
let $mail-cmd = ‘(echo “hi all “; uuencode ObjectChecker.sqr Object.sqr)’ | ‘mail -s “hi” nadarajvenkadesh.krishnan@aig.com’
call system using $mail-cmd #Status
if #status <> 0
show ‘ERROR: Could not send email!’
end-if
Note: if subject has spaces, then it should be enclosed with double quotes.

People Tools Tables

The People Tools Tables are the PS tables which store your Application designer object definition’s
For RECORDS AND INDEXES
PSRECDEFN; PSRECDEFNLANG; PSRECFIELD; PSINDEXDEFN;
For  PEOPLETOOLS PROJECTS
PSPROJECTDEFN;PSPROJECTITEM;PSPROJDEFNLANG;PSPROJECTDEP;PSPROJECTINC;PSPROJECTMSG ;PSPROJECTSEC
For FIELDS
PSDBFIELD;PSDBFIELDLANG;PSDBFLDLABL;PSDBFLDLABLLANG;
For TRANSLATES
PSXLATDEFN;PSXLATITEM;PSXLATITEMLANG;
For PANEL GROUPS
PSPNLGRPDEFN;PSPNLGDEFNLANG;PSPNLGROUP;PSPNLGROUPLANG;
For QUERIES
PSQRYDEFN;PSQRYDEFNLANG;PSQRYBIND;PSQRYBINDLANG;PSQRYCRITERIA;PSQRYEXPR;PSQRYFIELD;
PSQRYFIELDLANG;PSQRYFLAGS;PSQRYLINK;PSQRYRECORD;PSQRYSELECT;
For PROCESS DEFINITIONS
PRCSDEFN;PRCSDEFNLANG;PRCSDEFNGRP;PRCSDEFNPNL;PRCSDEFNXFER;PRCSDEFNNOTIFY;PRCSDEFNCNTDIST;PRCSDEFNMESSAGE;PRCSDEFNMETA;
PS_PRCSDEFNURL;PS_PRCSDEFNURL_LNG;PS_PRCSDEFNURLKEY;
For SQL
PSSQLDEFN;PSSQLDESCR;PSSQLLANG;PSSQLTEXTDEFN;
For APP ENGINE PROGRAMS
PSAEAPPLDEFN;PSAEAPPLLANG;PSAEAPPLSTATE;PSAEAPPLTEMPTBL;
For APP ENGINE SECTIONS
PSAESECTDEFN;PSAESECTDTLDEFN;PSAESTEPDEFN;PSAESTEPMSGDEFN;PSAESTMTDEFN;
PS_AEINSTANCENBR;PS_AELOCKMGR;
For URL DEFINITIONS
PSURLDEFN;.
PSURLDEFNLANG;
For USERS
PSOPRALIAS;PSOPRDEFN ;PSROLEUSER;PSUSERATTR;PSUSEREMAIL;PSUSERPRSNLOPTN;
PS_ROLEXLATOPR;PS_ROLEXLATOPR_LNG;PS_RTE_CNTL_RUSER;
For ROLES
PSROLEDEFN;PSROLEDEFNLANG;PSROLECANGRANT;PSROLECLASS;
For PERMISSION LISTS
PSCLASSDEFN;PSAUTHBUSCOMP;PSAUTHCHNLMON;PSAUTHCUBE;PSAUTHITEM;PSAUTHOPTN;
PSAUTHQUEUEMON;PSAUTHPRCS;PSAUTHSIGNON;PSAUTHWS;PSPRCSPRFL;PS_MC_OPR_SECURITY;
PS_MC_OPRID;PS_SCRTY_ACC_GRP;PS_SCRTY_QUERY;
 For SIGNON PEOPLECODE
PSSIGNONPPC;
For Integration Broker Queues
PSIBQUEUEINST;PSQUEUEDEFN;PSQUEUEDEFNLANG;PSQUEUEPART;

PeopleSoft Audit

To help us keep track of changes done to sensitive data by appropriate user, we use Audit.
Later we can query the Audit record to see the list of changes happened.
In PeopleSoft, we can set Audit at
1. Record Level
2. Field Level
3. Database Level
For Record Level and Field Level, Audit captures changes done to data for the online page. If the data is changed by any program using a SQL statement then Audit is not captured.
For Database Level, It covers both online and database changes done to the transaction record.
Base Records 
The base record is the record that you want to monitor, or audit, as in BU_ITEMS_INV. Presumably; the base record contains fields that you want to monitor. Limit the auditing of tables to the application tables and avoid auditing People Tools tables.
Audit Record
The audit record is a custom record that you create with Application Designer. It stores the audit information for the fields on the base record that the trigger collects. A sample name for audit record might be DPI_BUITM_AUDIT.

Implement Record level Audit 

Record level auditing allows you to have separate audit tables dedicated to one database record.

A)     Choose the Record:
Not all records in PeopleSoft need auditing. When there is such a business requirement, choose the record(s) that needs to be audited.
B)      Create the Audit Record:
The Audit record is essentially a copy of the record being audited. The easiest way to create a copy of your record is to do a Save As. Name the new record under standard record naming convention prefixed with AUDIT_
C)      Remove the unwanted: Delete fields that won’t be audited and Remove all key structures
D)     Add Audit Fields:
Insert the below fields (also known as audit fields) at the top of the new record in the below order
AUDIT_OPRID (Captures the User who performed an action)
AUDIT_STAMP (Captures the date and time when the action was performed)
AUDIT_ACTN (Captures the type of action performed)
AUDIT_RECNAME (Captures the name of the audited record definition. This field is used only when the same audit record is used for auditing multiple records)
On the Record Field Properties for AUDIT_STAMP, we need to check the Auto-Update checkbox. This is essential to correctly populate the date-time stamp.
E)  Build the audit record:
Your Audit record must be a Database record and you should be able to access it using Query.
F) Link them up
Open the Base Record that is to be audited. Open its properties. On the Use tab, under the Record Audit, specify the name of the audit record that we just created as the Record Name. Choose Audit Options based on your requirement.
 
Add – An Audit table row is inserted when a row is inserted in the base record
Delete – An Audit table row is inserted when a row is deleted from the base record
Change – Audit table row(s) is inserted when a row changes in the base record
Selective – Audit table row(s) is inserted when common field (present in both base record and audit record) changes
G)     Test the Auditing:  
                                                  Based on the Audit option that you have chosen, perform some transaction that can trigger the audit. Now query the audit record and check for new rows. Try to infer the meaning of each row that got added.
H)     AUDIT_ACTN :
A – Row inserted
D – Row deleted.
C – Row changed (updated), but no key fields changed.
K – Row changed (updated), and at least one key field changed.
N – Row changed (updated), and at least one key field changed.
In case of C and K the system writes old values to the audit table. While for N, the new values are written into the audit table.

Implement Field level Audit 

Field-level audits record when you insert, update, or delete a field value. The system writes a row of audit data to the PSAUDIT table for each field marked for audit. You may write multiple rows of audit data for a single transaction.

1.        The PSAUDIT table contains the following fields:

 • AUDIT_OPRID
• AUDIT_STAMP
• AUDIT_ACTN
• RECNAME
• FIELDNAME
• OLDVALUE
• NEWVALUE
• KEY1, KEY2, …
              2.      A field level audit is a record field property. To configure a field level audit
a)     Open the desired record.
b)     Double click the field you would like to audit.
c)      In the Audit section, select Field Add, Field Change, or Field Delete.

 
Field Add: Audits this field whenever a new row of data is added
Field Change: Audits this field whenever the content changes.
Field Delete: Audits this field whenever a row of data is deleted.
 d)     SELECT * FROM PSAUDIT WHERE RECNAME=’YOUR RECORD’ AND FIELDNAME =’FIELD NAME'; 


Implement Database level Audit 

PeopleSoft’s delivered Audit feature works only for changes made from online. We depend on RDBMS’s trigger feature to track changes made through non-PeopleSoft methods. PeopleSoft has come up with a Database Level auditing feature using which we can combine both the PS delivered Audit and Database’s Trigger feature

Trigger
The trigger is the mechanism that a user invokes upon making a change to a specified field. The trigger stores the audit information in the audit table. PeopleSoft enables you to create triggers. A sample name for a trigger might beVENDOR_TR.
Note: If you modify the record definition of the base record, then you must modify the audit record and re-create the associated trigger.
     Update Database Level Auditing:
Navigation: People Tools > Utilities > Audit > Update Database Level Auditing
1) Search for the PeopleSoft record name to audit. The system by default will create audit trigger record with the base record name suffixed by _TR
2) Select the Audit record name.
3) Audit Options available are Add, Change or Delete
4) Click on “Generate Code”. This will create the SQL statement to use for the Trigger creation
5) “Create Trigger Statement” section should have the SQL statement generated by above action
Note:
1) All the information entered above, gets captured in the PeopleTools trigger definition table – PSTRIGGERDEFN.
2) EnableDBMonitoring domain parameter must be set in PSADMIN for this feature to work

Perform Database Level Audit:
Navigation: People Tools > Utilities > Audit > Update Database Level Auditing
1) Select or create a Run Control ID
2) Select either “Create All Triggers” or “Create Trigger(s) On” depending on the requirement
3) Click Run which will trigger the Audit Application Engine – TRGRAUDPROG(Auditing Triggers). This process will fetch every row in PSTRIGGERDEFN and writes Create Trigger statements to the file – TRGCODEX.SQL, where Z represents a digit determined by the number of files that already exist in the output directory.
4) This step only creates the SQL Statement, and it should be run using SQL tool to create trigger(s)
   
To Delete Audit Trigger:
            1) Select People Tools, Utilities, Audit, Update Database Level Auditing
            2) Open the trigger that you want to delete
            3) Clear all the Audit options (Add, Change, and Delete)
           4) Click Generate Code
           5) Click Save
           6) Drop the trigger name from the database
Migrating:-
When migrating projects containing records that had audit record changes made to them, ensure the “Set Target Audit Flags from Source” flag is set in Copy Options:
Otherwise, the audit properties for these records won’t get copied across to the target environment.